Mastering Osteogenic Induction of MC3T3-E1 Subclone 14 Cells
Source: PricellaPublished: 2025-01-16
MC3T3-E1 Subclone 14 cells are a subclone isolated from the MC3T3-E1 cell line. These cells demonstrate high levels of osteoblastic differentiation when cultured in media containing ascorbic acid and 3–4 mM inorganic phosphate. In contrast, MC3T3-E1 Subclone 24 and Subclone 30 exhibit poor osteoblastic differentiation in ascorbic acid-containing media and fail to form extracellular matrix (ECM), making them suitable as negative controls for Subclone 14.
This article provides detailed information about MC3T3-E1 Subclone 14 cells, step-by-step instructions for osteogenic differentiation, and key considerations to ensure smooth and successful experimentation.
Note: The osteogenic differentiation experiment for MC3T3-E1 Subclone 14 cells is based on internal testing data from Pricella® and is for reference only.
Basic Information about MC3T3-E1 Subclone 14 Cells
Growth characteristics: Adherent cells
Cell morphology: Fibroblast-like
Recommended subculturing ratio: 1:3 to 1:4
Recommended medium change frequency: 2–3 times per week
Growth medium: MEMα + 10% FBS + 1% P/S
Cryopreservation conditions:
• Freezing medium: 55% basal culture medium + 40% FBS + 5% DMSO
• Temperature: Liquid nitrogen
Culture conditions:
• Atmosphere: 95% air, 5% CO₂
• Temperature: 37°C
Osteogenic Differentiation Procedure for MC3T3-E1 Subclone 14 Cells
(Example: 12-well plate)
1 Cell Preparation: Culture MC3T3-E1 Subclone 14 cells until they reach 80–90% confluency. Dissociate the cells with trypsin and count them.
2 Seeding Cells: Seed cells at a density of 2-3×10⁴ cells/cm² in a 12-well plate. Add 1 mL of complete growth medium per well.
3 Place the seeded cells in a 37°C, 5% CO₂ incubator for culture.
4 Osteogenic induction medium consists of basal medium, serum, and additives. Mix thoroughly before use.
5 When the cells reach 80–95% confluency, carefully remove the complete medium. Add 1 mL of pre-warmed osteogenic induction medium to each well.
6 Replace the osteogenic induction medium with fresh, pre-warmed medium every 48–72 hours.
7 Induce the cells for 2–4 weeks. Monitor cell morphology and calcium nodule formation regularly to determine if further staining (e.g., Alizarin Red) is required.
Results of Osteogenic Differentiation
Cell confluency is approximately 95%, before induction:
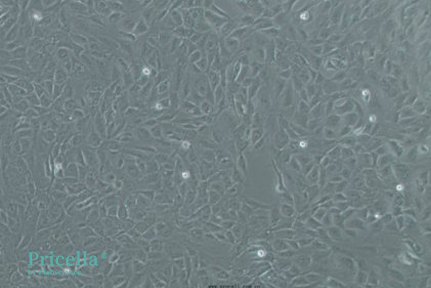
Brightfield image before induction
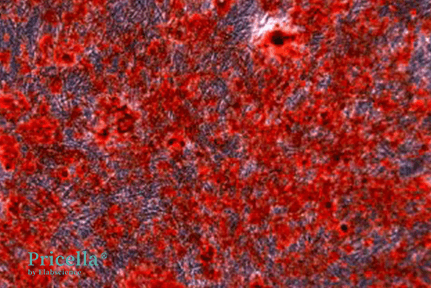
After 15 Days of Induction, images of unstained and Alizarin Red-stained cells:
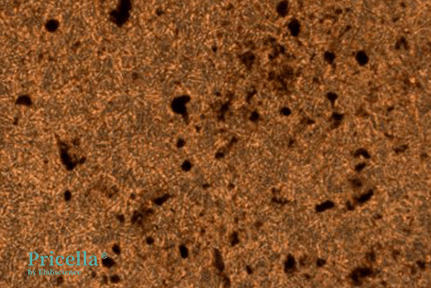
Unstained (Day 15)
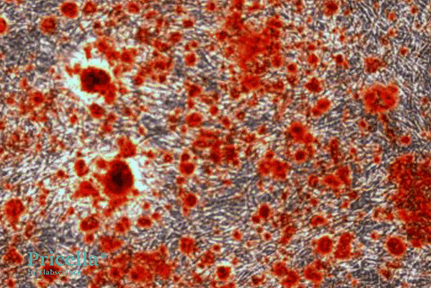
Alizarin Red staining (Day 15)
Note: Extend the induction time if additional calcium nodule formation is desired.
After 20 Days of Induction, images of unstained and Alizarin Red-stained cells:
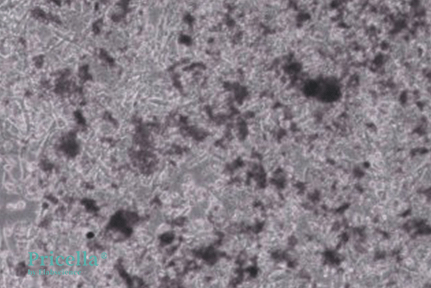
Unstained (Day 20)
Alizarin Red staining (Day 20)
Key Considerations for Osteogenic Induction
• Start induction when cells reach 90–95% confluency. Avoid over-confluency, as this may cause cell detachment or poor health.
• Use cells in early passages to ensure optimal induction results.
• Uneven seeding can lead to inconsistent differentiation, low differentiation rates, or floating cells.
• For long induction periods, coat culture plates with gelatin to prevent cell detachment.
• Pre-warm the osteogenic induction medium to 37°C. When replacing the medium, leave a small amount of old medium to buffer the cells. Add fresh medium gently along the well walls to avoid mechanical stress.
• Avoid prolonged cell exposure outside the incubator and excessive shaking of culture plates to prevent cell detachment.
• Add a small amount of PBS during imaging to minimize light artifacts and improve image quality.
Prev: Advanced Reduced Serum Media: A Superior Choice for Cell Culture