Essential Laboratory Skill: A Step-by-Step Guide to Cell Counting
Source: PricellaPublished: 2024-06-11
In cell culture, cell counting is a fundamental skill. Reflecting back on the early days in the laboratory, one of the most challenging tasks was cell counting. Despite its apparent simplicity, it often led to confusion, eye strain, and frustration. The process was easily disrupted, and a momentary distraction from others could result in significant setbacks.
The primary reason cell counting seems so arduous is often due to a lack of proper technique. When automated instruments encounter anomalies in cell counting and classification, manual microscopic examination becomes crucial. Below, I have summarized the detailed steps for accurate cell counting, providing a reference for your experiments.
1. Preparation of the Cell Counter (Hemocytometer)
Clean the coverslip and hemocytometer using 70% ethanol, then allow them to air dry.
Carefully place the dried coverslip over the hemocytometer.
Note: Ensure that both the coverslip and the hemocytometer are completely dry before use, as residual moisture can affect cell filling and counting accuracy.
2. Preparation of Cell Suspension
For adherent cells, use trypsin(PB180225) to detach the cells from the culture dish surface. (Suspension cells do not require trypsin and can be diluted to the appropriate concentration directly.)
Add an appropriate amount of serum-containing medium to neutralize the trypsin and resuspend the cells to achieve a homogeneous cell suspension. Ensure thorough dispersion of the cells without leaving any cell clumps, but avoid exerting excessive pressure.
Note: Over-digestion or insufficient digestion can both lead to inaccurate counting results.
Trypan Blue (PB180423)Staining (Optional)
To assess cell viability, mix equal volumes of the cell suspension and 0.4% Trypan Blue solution.
Incubate at room temperature for 3-5 minutes (the staining time for suspension cells may be extended as needed) to allow the Trypan Blue to fully penetrate non-viable cells, which will appear blue.
3. Loading the Hemocytometer
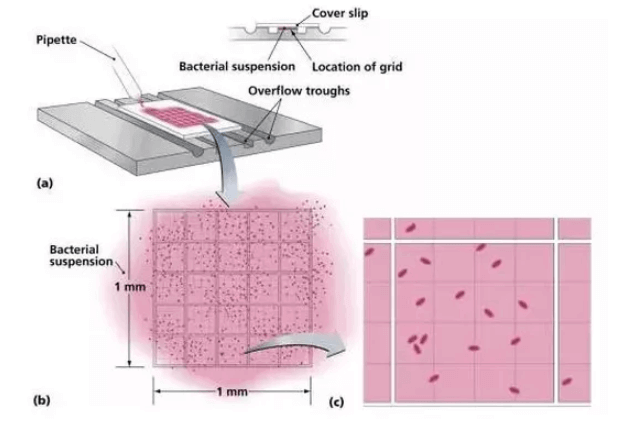
Using a pipette or micropipette, dispense the cell suspension or cell/Trypan Blue mixture at the edge of the counting chamber. The liquid will be drawn under the coverslip by capillary action, filling the chamber.
Note: For consistent results when counting multiple samples, ensure the volume used to fill each chamber is uniform, typically around 10 µl per chamber.
In the same manner, load the counting sample into the chamber on the opposite side of the hemocytometer.
Allow the hemocytometer to sit undisturbed for a few minutes to let the cells settle and distribute evenly.
4. Cell Counting
Using a microscope at 100x magnification, move the hemocytometer to bring the central large square of the counting grid into view. This square is surrounded by three parallel lines and contains a dense grid in the center. The central square should approximately fill the entire field of view (as indicated by position 3 in the diagram below).
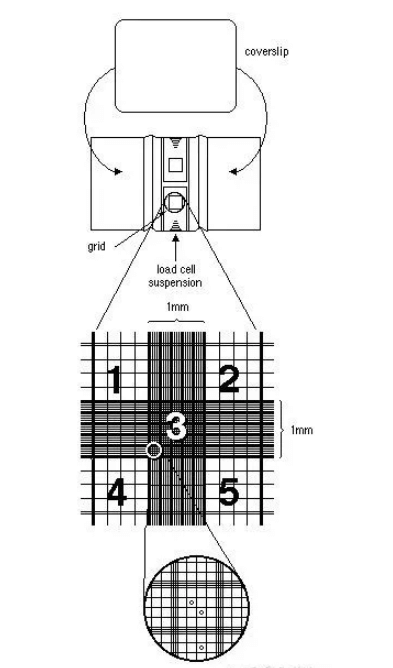
Count the cells in the large squares labeled 1, 2, 4, and 5. (To minimize counting errors, it is best to adjust the cell concentration to 20-50 cells per large square.) Repeat the counting process for the other side of the hemocytometer, totaling 8 large squares, then calculate the average.
The counting rule is: "Count cells touching the top and left lines, but not those touching the bottom and right lines." (The criterion is whether the cells touch the middle line of the three boundary lines, as illustrated in the diagram below.)
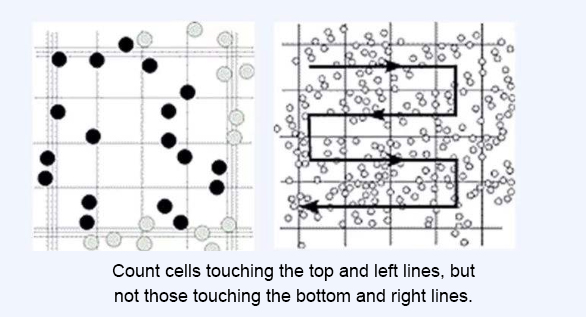
If multiple cells are clumped together, count them as a single cell. If there are many clumps, resuspend the cells more thoroughly, or even re-sample and digest the cells again until the majority are single cells.
5. Calculating Cell Concentration
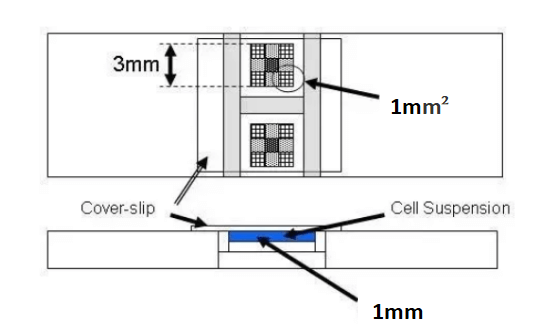
From the diagram, we can determine that the volume of each large square is:
1 mm2×0.1 mm = 0.1 mm3 =10-4 cm3= 10-4 ml
Therefore, the volume of each large square is 0.0001 milliliters. To calculate the number of cells per milliliter of sample, multiply by 10,000.
When Trypan Blue staining is not used, the number of cells per milliliter of sample can be calculated using the following formula:Number of cells per ml of sample=Average number of cells per large square×Dilution factor×104
If Trypan Blue staining is used, it is also necessary to calculate the percentage of viable cells:Viable cell percentage(%) = (Number of Trypan Blue-excluding cells/Total number of cells)x100
The formula for calculating the number of viable cells per milliliter of sample is:Number of viable cells per ml of sample=Average number of cells per large square×Viable cell percentage×Dilution factor×2×10⁴
Note: The factor of 2 is due to the equal volume mixing during Trypan Blue staining, effectively diluting the sample by half.
After reviewing the steps and principles above, one might wonder: why do we count cells? What is the significance of cell counting? When we want to understand cell growth, besides directly observing cell morphology, constructing growth curves and calculating cell doubling time are widely used evaluation metrics.
Although manually counting cells with a hemocytometer is laborious and demands precision from the experimenter, and despite the availability of many automated cell counters, manual counting remains the simplest and most practical method widely adopted in laboratories for various cell types encountered in scientific research.
Prev: Strategies for Passaging and Culturing H22 Hepatocellular Carcinoma Cells from Ascitic Fluid